선언

타입이라는 것은 변수(Int,string, char)같은 것을 말한다.

Dictionary<key 타입,value 타입> IDTable;


생성

IDTable = new Dictionary<key 타입, value 타입>();


추가

딕셔너리는 중복 키를 허용하지 않는다. 따라서, 키 값을 추가하기전 딕셔너리에 값이 이미 있는지 확인하는 조건문을 Add 함수와 같이 사용한다. ContainsKey 함수는 찾길 원하는 키가 없어도 예외를 발생시키지 않는 특성있고 사용하길 추천한다.

if (!(IDTable.ContainsKey(찾길 원하는 키)))
	IDTable.Add(Key, Value);


접근

foreach문을 사용하여 키값을 기준으로 값을 찾거나 value값을 기준으로 값을 찾을 수 있다.

아래 foreach 조건문에는 딕셔너리.Keys를 사용하였고 이렇게 되면 for문에 key 문자열에는 key 값이 담기게 된다.

만약 딕셔너리.Values를 사용한다면 key 문자열에는 value값이 담기게 된다.

string fake_ip ="";
if (IDTable.ContainsKey(ip))
{
	string id = IDTable[ip];
		foreach (string Key in IDTable.Keys)
		{
			if (!(ip.Equals(Key)) && IDTable[Key].Equals(id))
			{
				fake_ip = Key;
				IDTable.Remove(fake_ip);
				IDTable.Remove(ip);
				break;
			}
		}
}


삭제

IDTable.Remove(key값);


'C#' 카테고리의 다른 글

.NET Reflection  (0) 2021.03.29
Dbset 직접 바인딩 에러 해결법  (0) 2021.02.25
외부 프로젝트 참조하기  (0) 2021.02.25
[Winform] Dock  (0) 2021.01.22
C# Thread  (0) 2020.12.01

사용법

1. 빈 오브젝트 추가후 Video Capture 2 Local Example 스크립트를 Component로 준다.

2. 위 이지에서 보이듯 Previewer라는 프리팹을 생성한 엠티 오브젝트의 자식으로 만든다.


3. 아래 보이는 text는 휴대폰 어느곳에 동영상이 저장되는지 확인하기 위함이다. 


아래 코드는 경로 확인을 위한 코드를 기존 코드에 추가한 내용이다.

using NRKernal.Record;
using System.IO;
using System.Linq;
using UnityEngine;
using UnityEngine.UI;

namespace NRKernal.NRExamples
{
    [HelpURL("https://developer.nreal.ai/develop/unity/video-capture")]
    public class VideoCapture2LocalExample : MonoBehaviour
    {
        public NRPreviewer Previewer;

        [SerializeField]
        private Text text;

        // Save the video to Application.persistentDataPath
        public string VideoSavePath
        {
            get
            {
                string timeStamp = Time.time.ToString().Replace(".", "").Replace(":", "");
                string filename = string.Format("Nreal_Record_{0}.mp4", timeStamp);
                string filepath = Path.Combine(Application.persistentDataPath, filename);
                return filepath;
            }
        }

        NRVideoCapture m_VideoCapture = null;

        void Start()
        {
            CreateVideoCaptureTest();
        }

        void CreateVideoCaptureTest()
        {
            NRVideoCapture.CreateAsync(false, delegate (NRVideoCapture videoCapture)
            {
                if (videoCapture != null)
                {
                    m_VideoCapture = videoCapture;
                }
                else
                {
                    Debug.LogError("Failed to create VideoCapture Instance!");
                }
            });
        }

        public void StartVideoCapture()
        {
            Resolution cameraResolution = NRVideoCapture.SupportedResolutions.OrderByDescending((res) => res.width * res.height).First();
            Debug.Log(cameraResolution);

            int cameraFramerate = NRVideoCapture.GetSupportedFrameRatesForResolution(cameraResolution).OrderByDescending((fps) => fps).First();
            Debug.Log(cameraFramerate);

            if (m_VideoCapture != null)
            {
                Debug.Log("Created VideoCapture Instance!");
                CameraParameters cameraParameters = new CameraParameters();
                cameraParameters.hologramOpacity = 0.0f;
                cameraParameters.frameRate = cameraFramerate;
                cameraParameters.cameraResolutionWidth = cameraResolution.width;
                cameraParameters.cameraResolutionHeight = cameraResolution.height;
                cameraParameters.pixelFormat = CapturePixelFormat.BGRA32;
                cameraParameters.blendMode = BlendMode.Blend;

                m_VideoCapture.StartVideoModeAsync(cameraParameters, OnStartedVideoCaptureMode);

                Previewer.SetData(m_VideoCapture.PreviewTexture, true);
            }
        }

        public void StopVideoCapture()
        {
            if (m_VideoCapture == null)
            {
                return;
            }
            Debug.Log("Stop Video Capture!");
            m_VideoCapture.StopRecordingAsync(OnStoppedRecordingVideo);
            Previewer.SetData(m_VideoCapture.PreviewTexture, false);
        }

        void OnStartedVideoCaptureMode(NRVideoCapture.VideoCaptureResult result)
        {
            Debug.Log("Started Video Capture Mode!");
            // 경로 확인을 위해 추가한 코드
            text.text = VideoSavePath;
            m_VideoCapture.StartRecordingAsync(VideoSavePath, OnStartedRecordingVideo);
        }

        void OnStartedRecordingVideo(NRVideoCapture.VideoCaptureResult result)
        {
            Debug.Log("Started Recording Video!");
        }

        void OnStoppedRecordingVideo(NRVideoCapture.VideoCaptureResult result)
        {
            Debug.Log("Stopped Recording Video!");
            m_VideoCapture.StopVideoModeAsync(OnStoppedVideoCaptureMode);
        }

        void OnStoppedVideoCaptureMode(NRVideoCapture.VideoCaptureResult result)
        {
            Debug.Log("Stopped Video Capture Mode!");
        }
    }
}

tip)동영상 파일 경로를 찾는데 많은 시간을 사용하였기에 추가적으로 경로에 관한 이야기를 하겠다.

파일 경로는 Android 폴더에 data 폴더 안에 com.회사이름.product_name 폴더안에 파일에 동영상이 저장된다.

외부 프로그램을 실행시키기 위해 필요한 using

using System.Diagnostics;

프로세스를 윈도우 최상위 화면으로 활성화 시키기 위해 필요한 using

using System.Runtime.InteropServices;

    // 클래스 내부에 
    [DllImport("user32")]
    private static extern bool SetForegroundWindow(IntPtr handle);


외부 프로그램 실행 방법

// 실행파일 경로와 이름
string exe_name = Application.StartupPath + "\\process.exe";
// 실행파일 실행
Process.Start(exe_name);

Tip) 실행파일 이름에있는 확장자 .exe를 까먹으면 오류가 발생할 수 있다.


외부 프로그램 실행여부 확인 방법 & 화면에서 프로세스를 제일 위로 올리기

// Process.GetProcess(): 실행중인 프로세스 배열 반환
foreach(Process process in Process.GetProcesses())
{
	// "exe_name"라는 이름을 가진 프로세스가 존재하면 true를 리턴한다.
	if(process.ProcessName.StartsWith("exe_name"))
    {
    	// 프로세스를 윈도우 화면 최상단에 배치
    	SetForegroundWindow(process.MainWindowHandle);
    	// 프로세스를 죽이는 함수
    	process.Kill();
    }
}


삭제

dd - 현재 커서의 행 삭제

숫자 dd - 현재 커서부터 숫자만큼의 행삭제

x -현재 커서가 위치한 글자 삭제(Del)

X -현재 커서가 위치한 앞 글자 삭제


복사

yy - 현재 커서가 있는 행을 복사

숫자 yy - 현재 커서부터 숫자만큼의 행을 복사

p - 복사한 내용을 현재 행 이후에 붙여넣기

P - 복사한 내용을 현재 행 이전에 붙여넣기


문자열찾기

/문자열 - 해당 문자열을 찾음

n - 찾은 문자 중에서 다음 문자로 이동


행번호 표기하기

:set number or set nu

:set nonu

00-installer-config.yaml 파일을 설정시 주의해야 할점은 들여쓰기를 절대 틀려서는 안된다.

그리고 파일 설정일 끝났으면

$ sudo netplan try

명령어로 고정 IP 할당이 잘 되었는지 확인해보는 것이 좋다.

https://linuxhint.com/setup_static_ip_address_ubuntu/


Setting Up Static IP Address on Ubuntu 20.04 LTS – Linux Hint

Freelancer & Linux System Administrator. Also loves Web API development with Node.js and JavaScript. I was born in Bangladesh. I am currently studying Electronics and Communication Engineering at Khulna University of Engineering & Technology (KUET), one of

linuxhint.com


-------------------------------------------------------------------------------------------------

그외 리눅스 단축키

https://4475.tistory.com/489


리눅스 콘솔 단축키 및 명령어

리눅스 콘솔 단축키 Shift + PageUp : 상위 페이지 이동 Shift + PageDown : 아래 페이지 이동 출처 : http://andstory.com/zb41/zboard.php?id=tip_board&page=16&sn1=&divpage=1&sn=off&ss=on&sc=on&select_a..

4475.tistory.com

내가 필요한 단축키는 커멘드 창에 입력하던 명령어를 한번에 지울수 있는 단축키이다.

ctrl +u가 내가 찾던 명령어였는데 커서 뒤에있는 명령어를 바로 삭제해준다.

트리거에 자동차가 들어오면 레이저포인터로 가르키는 코드 해당 코드를 사용하는 게임 오브젝트는 LineRenderer 컴포넌트와 콜라이더 설정이 되어있어야 한다.

using System.Collections;
using System.Collections.Generic;
using UnityEngine;

public class lineRendererTest : MonoBehaviour
{
    private LineRenderer lineRenderer;

    // Start is called before the first frame update
    void Start()
    {
        lineRenderer = GetComponent<LineRenderer>();
        // 라인이 가지개될 색상 표현
        Material material = new Material(Shader.Find("Standard"));
        material.color = new Color(0, 195, 255, 0.5f);
        lineRenderer.startWidth = 0.2f;
        lineRenderer.endWidth = 0.2f;
        // 끝점과 시작점 2개
        lineRenderer.positionCount = 2;
    }

    // Update is called once per frame
    void Update()
    {
        
    }

    private void OnTriggerStay(Collider other)
    {
        if (other.tag == "Car")
        {
            lineRenderer.SetPosition(0, transform.position);
            lineRenderer.SetPosition(1, other.transform.position);
        }

    }

    private void OnTriggerExit(Collider other)
    {
        if (other.tag == "Car")
        {
            lineRenderer.SetPosition(1, transform.position);
        }
    }
}


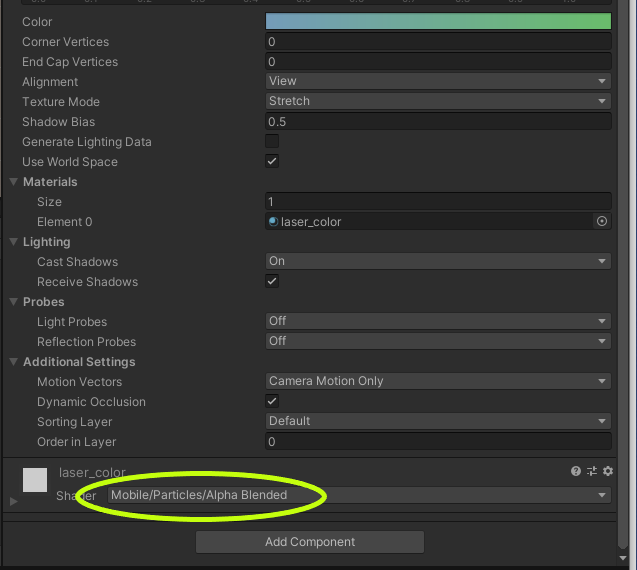
레이저 메터리얼을 위 그림과 같은 설정으로 변경하여준다. 그렇지 않으면 레이저에 색상이 검정색이나 분홍색만 나오고 설정한 색상을 표현하지 않는다.

https://developer.nreal.ai/develop/unity/android-quickstart


Home

Nreal strives to build mixed reality experiences for everyone and empower developers to create apps that can propel a new era of entertainment and productivity.

www.nreal.ai


일단 프로젝트를 생성한 후  NRSDK를 다운로드 한 후 임포트한다.

https://developer.nreal.ai/download


Home

Nreal strives to build mixed reality experiences for everyone and empower developers to create apps that can propel a new era of entertainment and productivity.

www.nreal.ai


다음으로 빌드 세팅을 클릭한 후 안드로이드 플랫폼을 선택한다.

1. Player Settings..에서 Player -> Other Settings -> Api Compatibility Level*을 .NET 4.x로 설정한다.


2. Resolution and Presentation -> Default Orientation -> Portrait 

휴대폰 모드를 세로 모드로 고정한다는 의미이다.

3. Auto Graphics API가 체크 해제되어있는지 확인한다.

4. Vulkan을 제거한다. Vulkan은 프로그램을 계발할 때마다. 항상 제거하고있는 느낌이 든다.


5. Company Name을 default이름에서 다른 이름으로 변경한다.

6. Minimum API Level과 Target API Level을 Android 8.0으로 맞춘다.

7. API Level 밑에보면 Write Permission 설정하는 부분이 있다 이 부분을 External (SDCard)로 변경한다.

8. 이번엔 프로젝트 세팅에서 Quality를 선택한 후 V Sync Count를 Don't Sync로 변경하여준다.


https://releases.ubuntu.com/18.04/


Ubuntu 18.04.5 LTS (Bionic Beaver)

Select an image Ubuntu is distributed on three types of images described below. Desktop image The desktop image allows you to try Ubuntu without changing your computer at all, and at your option to install it permanently later. This type of image is what m

releases.ubuntu.com

설치를 시작하기전 준비물로 USB와 우분투 iso 파일을 준비한다.


1. refus로 리눅스 서버 설치 usb를 만든다.

https://rufus.ie/


Rufus - The Official Website (Download, New Releases)


rufus.ie


2. 해당 컴퓨터에 usb를 연결한 후 BIOS 모드로 진입한다.(del 또는 F2 연타)

3. 텝에서 Boot 선택 후 Boot Option Priorites 에서 USB를 첫번째로 선택

4. F10으로 세이브 후 리부트를 진행한 다음 설치한다.

5. 설치가 완료되면 BIOS 모드로 재진입 한 후 우선 순위를 되돌린다.

6. USB를 제거한 후 리부팅한 후 잘 설치되었는지 확인한다.


설치중 검색한 영어 단어

destructive 파괴적인

Invoke란 호출이라는 의미를 가지고 있다.


Unity에는 Invoke이라는 함수가 존재한다. 

이 함수를 사용하는 방법은

Invoke("지연 시킬 함수 명", 지연시간f);

이 함수는 특정 함수를 특정 시간 뒤에 수행할 수 있도록 하는 함수이다.


다음으로 InvokeRepeating이라는 함수도 존재한다. 

이 함수를 사용하는 방법은 

InvokeRepeating("지연 및 반복시킬 함수 명", 처음 지연시간f, 지연후 반복할 시간f);


다음으로 유용하게 사용할 수 있는 함수로 contains함수가 존재한다.

https://ponyozzang.tistory.com/331


C# Contains 값이 존재하는지 확인하는 방법 및 예제

C#에서 문자열이나 배열, 리스트에 지정한 문자가 포함되어 있는지 또는 이미 등록되어 있는지 확인하는 방법으로 Contains 또는 정규 표현식을 사용합니다. 이번에는 Contains를 사용하여 문자열이

ponyozzang.tistory.com

사용 형식은

문자열.contains("str");
리스트.contains("str");
배열.contains("str");

원하는 단어를 문자열이 포함하였는지 확인하는데 도움을 주는 함수이다.

<text 스크립트에서 설정>

using UnityEngine.UI; 을 먼저 사용

public Text txt; 이런 느낌으로 text 설정

입력은 ScriptTxt.text = ""; 이런 느낌이고 느낌표 안에 원한는 문자열을 입력하면 된다.


<특정 객체 크기 변경>

transform.localScale = new Vector3(1f, 1f, 1f);


<삽질한 부분>

<스트림 2개 생성>

streamer_2 = new AugmentedRealityStreamer("ws://192.168.1.162:4649/Broadcast", ArMediaPlayer_2);
streamer_2.Connect(name);

처음 봤을 때 스트리머 생성시 할당할 매개변수에 MediaPlayer를 넣는 공간이 있어서

각각 MediaPlayer 별로 스트림을 생성하려고 하였다.

그 후 보니 서버의 User List에서 같은 IP가 2개가 발견 되었다.  이를 본 후 굳이 스트리머를 2개 생성할 필요가 있을 까 생각 되어서 1나만 일단 생성해두었다. 현재 상태를 보면 렉이 가끔식 발견된다. 따라서 다시 2개로 수정해야 할 필요도 있을 것 같다. 


<코루틴 함수로 이동 시키기>

첫번째

private IEnumerator moveToTarget(int type)
{
	Vector3 nowPs = avpro.transform.position;
	Vector3 live_nowPs = live_avpro.transform.position;

	while (true)
	{
		if(type == 1)
		{
			avpro.transform.position = Vector3.MoveTowards(nowPs, mid_ps.transform.position, 0.1f);
			live_avpro.transform.position = Vector3.MoveTowards(live_avpro.transform.position, low_ps.transform.position, 0.1f);
		}
		else if(type == 2)
        {
			avpro.transform.position = Vector3.MoveTowards(nowPs, low_ps.transform.position, 0.1f);
			live_avpro.transform.position = Vector3.MoveTowards(live_avpro.transform.position, mid_ps.transform.position, 0.1f);
		}

		/** 1초 딜레이 **/

		yield return new WaitForSeconds(0.5f);

	}

}


두번쨰 변경

		private IEnumerator main_video()
		{
			
			for(int i=0; i<200; i++)
			{
				avpro.transform.localScale = Vector3.MoveTowards(small_sc, big_sc, 0.2f);
				live_avpro.transform.localScale = Vector3.MoveTowards(big_sc, small_sc, 0.2f);
				avpro.transform.position = Vector3.MoveTowards(low_ps.transform.position, mid_ps.transform.position, 0.2f);
				live_avpro.transform.position = Vector3.MoveTowards(mid_ps.transform.position, low_ps.transform.position, 0.2f);

				yield return new WaitForSeconds(0.5f);
			}

		}

		private IEnumerator main_live()
		{
			for (int i = 0; i < 200; i++)
			{
				avpro.transform.localScale = Vector3.MoveTowards(big_sc, small_sc, 0.1f);
				live_avpro.transform.localScale = Vector3.MoveTowards(small_sc, big_sc, 0.1f);
				avpro.transform.position = Vector3.MoveTowards(mid_ps.transform.position, low_ps.transform.position, 0.1f);
				live_avpro.transform.position = Vector3.MoveTowards(low_ps.transform.position, mid_ps.transform.position, 0.1f);

				yield return new WaitForSeconds(0.5f);

			}

		}

코루틴 사용시 주의사항

if(coroutine != null)
{
	StopCoroutine(coroutine);
}
coroutine = main_video();
StartCoroutine(coroutine);

이런 식으로 작성해야 한다


<유니티 UI 우선순위>


유니티에 가끔식 2D를 보면 겹치는 이미지가 있다.

이 이미지의 우선 순위는 첫번째 자식 객체에 가까울 수록 밑에 깔리고 뒤로 갈수록 위에 싸이는 구조로 간다.

따라서 아래와 같이 순서를 직접 변경해줌으로써 누가 뒤에 깔리고 앞으로 올지 정할 수 있다.

avpro.transform.SetAsFirstSibling();

+ Recent posts