안녕하세요! 여러분들 오늘은 SharedPreference에 대해 알아보아요
간단한 로그인 기능을 구현해볼 것입니다.
1) 프로젝트를 생성합니다.
empty 설정 해주세요
2) xml 코드를 작성합니다.
코드를 작성하다가 android:onClick="erase" 에서는 붉은 줄이 생길 텐데요,
그러면 alt + enter 키로 자바 폴더에 생성하기 를 하시면 간단하게
터치 기능을 사용할 수 있습니다.
|
1
2
3
4
5
6
7
8
9
10
11
12
13
14
15
16
17
18
19
20
21
22
23
24
25
26
27
28
29
30
31
32
33
34
35
36
37
38
39
40
41
42
43
44
45
46
47
48
49
50
51
52
53
54
55
56
57
58
59
60
61
62
63
64
65
66
67
68
69
70
71
72
73
74
75
76
77
78
79
80
81
82
83
84
|
<?xml version="1.0" encoding="utf-8"?>
<androidx.constraintlayout.widget.ConstraintLayout xmlns:android="http://schemas.android.com/apk/res/android"
xmlns:app="http://schemas.android.com/apk/res-auto"
xmlns:tools="http://schemas.android.com/tools"
android:layout_width="match_parent"
android:layout_height="match_parent"
tools:context=".MainActivity">
<LinearLayout
android:layout_width="0dp"
android:layout_height="0dp"
android:layout_marginStart="32dp"
android:layout_marginLeft="32dp"
android:layout_marginTop="60dp"
android:layout_marginEnd="32dp"
android:layout_marginRight="32dp"
android:layout_marginBottom="32dp"
android:orientation="vertical"
app:layout_constraintBottom_toBottomOf="parent"
app:layout_constraintEnd_toEndOf="parent"
app:layout_constraintStart_toStartOf="parent"
app:layout_constraintTop_toTopOf="parent">
<TextView
android:id="@+id/textView"
android:layout_width="match_parent"
android:layout_height="wrap_content"
android:text="로그인"
android:textStyle="bold"
android:gravity="center"
android:textSize="25sp"/>
<EditText
android:layout_marginTop="30dp"
android:id="@+id/editText"
android:layout_width="match_parent"
android:layout_height="wrap_content"
android:ems="10"
android:hint="ID 입력"
android:inputType="textPersonName" />
<EditText
android:id="@+id/editText2"
android:layout_width="match_parent"
android:layout_height="wrap_content"
android:ems="10"
android:hint="비밀번호 입력"
android:inputType="textPersonName" />
<LinearLayout
android:layout_width="match_parent"
android:layout_height="wrap_content"
android:orientation="horizontal">
<Button
android:id="@+id/button"
android:layout_width="wrap_content"
android:layout_height="wrap_content"
android:layout_weight="1"
android:onClick="erase"
android:text="지우기" />
<Button
android:id="@+id/button2"
android:layout_width="wrap_content"
android:layout_height="wrap_content"
android:layout_weight="1"
android:onClick="confirm"
android:text="로그인" />
</LinearLayout>
<CheckBox
android:layout_marginTop="10dp"
android:id="@+id/checkBox"
android:layout_width="match_parent"
android:layout_height="wrap_content"
android:text="아이디 저장하기"
/>
</LinearLayout>
http://colorscripter.com/info#e" target="_blank" style="color:#4f4f4ftext-decoration:none">Colored by Color Scripter
|

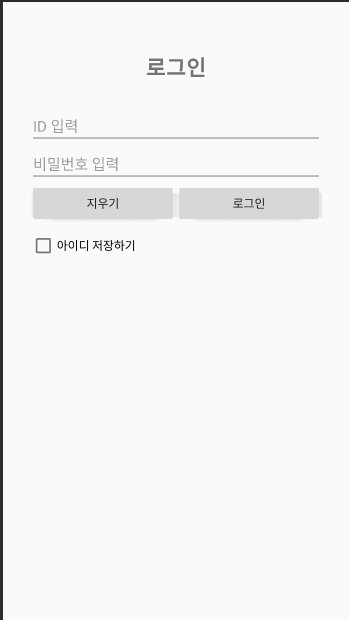
따라 해 보시면 위의 이미지와 같이 됩니다.
위의 이미지를 보면 아이디 저장하기라는 체크 박스가 있습니다.
체크가 된 상태인지 onStop메서드가 호출될 때 확인할 것이며
체크가 되었다면 sharedPreference를 사용하여 File이라는
파일에 아이디를 저장해 둘 것입니다.
3) Java파일 코드를 작성합니다.
이번엔 기능을 넣기 위해 자바 파일을 설정합니다.
|
1
2
3
4
5
6
7
8
9
10
11
12
13
14
15
16
17
18
19
20
21
22
23
24
25
26
27
28
29
30
31
32
33
34
35
36
37
38
39
40
41
42
43
44
45
46
47
48
49
50
51
52
53
54
55
56
57
58
59
60
61
62
63
64
65
66
67
68
69
70
71
72
|
package com.example.test_sharedpreference;
import android.content.SharedPreferences;
import android.os.Bundle;
import android.view.View;
import android.widget.CheckBox;
import android.widget.EditText;
public class MainActivity extends AppCompatActivity {
private EditText editText1;
private EditText editText2;
private CheckBox checkBox;
@Override
protected void onCreate(Bundle savedInstanceState) {
super.onCreate(savedInstanceState);
setContentView(R.layout.activity_main);
editText1 = findViewById(R.id.editText);
editText2 = findViewById(R.id.editText2);
checkBox = findViewById(R.id.checkBox);
//File이란 파일로 저장해둔 값을 가져오기위한 설정
SharedPreferences sf = getSharedPreferences("File",MODE_PRIVATE);
//text1에 값이 있으면 가져오고 두번째 인자는 없을경우 가져오는 값이다.
String text1 = sf.getString("text1","");
// text!가 그냥 공백이 아니라면 아이디 저장이된 상태이기 때문에 체크박스를
// 체크 상태로 변환한다.
if(!(text1.equals("")))
checkBox.setChecked(true);
editText1.setText(text1);
}
public void erase(View view) {
editText1.setText("");
editText2.setText("");
}
public void confirm(View view) {
}
@Override
protected void onStop() {
super.onStop();
SharedPreferences sharedPreferences = getSharedPreferences("File",MODE_PRIVATE);
//저장을 하기위해 editor를 이용하여 값을 저장시켜준다.
//체크 박스에 체크가 됬다면 아이디를 저장한다.
if(checkBox.isChecked()) {
String text1 = editText1.getText().toString();
editor.putString("text1", text1);
}
else
{
editor.putString("text1", "");
}
// 값을 다 넣었으면 commit으로 완료한다.
}
}
http://colorscripter.com/info#e" target="_blank" style="color:#4f4f4ftext-decoration:none">Colored by Color Scripter
|
이상으로 sharedPreference를 사용해 보았습니다.
혹시 궁금한 것이 있다면 댓글로 남겨주세요
소스코드는 깃허브에 있습니다.
https://github.com/3210439/test_sharedPreference
3210439/test_sharedPreference
Contribute to 3210439/test_sharedPreference development by creating an account on GitHub.
github.com
'안드로이드_JAVA' 카테고리의 다른 글
| [안드로이드_Java] RecyclerView+CardView #2 (0) | 2020.01.03 |
|---|---|
| [안드로이드_Java] RecyclerView+CardView #1 (1) | 2020.01.02 |
| [안드로이드_JAVA] TapLayout (0) | 2019.11.30 |
| [안드로이드_JAVA] 옵션 메뉴 (0) | 2019.11.27 |